


Make Your Own Floral Table Garland for Holiday Dinner Party Decor
During the holidays, natural materials and homemade decorations can make a celebration feel more festive and authentic, but they can also be a lot of work to produce. Instead of taking on the burden yourself, turn some of the decorating into the party itself.
Gather with a few friends around the dinner table, sipping something delicious, and follow along as Rhiannon Smith from San Francisco’s Farmgirl Flowers shows us how to create a high-drama centerpiece for a winter fete.
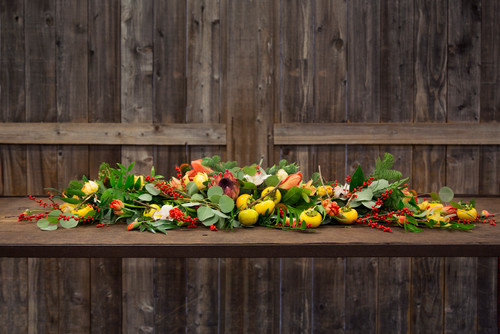
This garland features a movable evergreen base that, on its own, should last a few weeks. Add the fillers on the day you would like to use your centerpiece so that they’ll look their best during your celebration or event.
Follow these instructions to create the garland pictured here, or choose different foliage and flowers for a look that suits your holidays.
Plant Materials
For the garland base: Cut evergreen stems about 7 to 8 inches long and remove leaves from the bottom inch or two.
- Asian bayberry (Nageia nagi)
- Silver dollar tree (Eucalyptus cineria)
- Cocculus
Experiment with other evergreens if the above materials aren’t available where you are. Try to include more than one color and texture, but avoid using more than three types of foliage so the garland doesn’t get too busy.
To fill the garland: Smith used about four bouquets of flowers and berry branches to fill the garland, cutting most stems 4 to 5 inches long.
- Conifer branches (pine)
- Small blooms (orchids, tulips, roses)
- Buds and berries (Echinacea pods and holly branches)
- Focal-point flowers (protea and amaryllis)
- Seasonal edibles (persimmons)
Choose one focal color, in this case red, with supporting colors, like muted pinks and golds, to complement the focal-point flowers without overwhelming the garland.
Other Tools and Materials:
- Scissors
- Paddle wire
- Grapevine wire cut to about a third of your table length (in this case about 2½ feet long)
- Pruning shears
- Wire cutters
The Garland Base
1. Grab four or five evergreen stems to start the garland; use at least one stem of each kind. You want your bundle to be about 7 to 8 inches long and about 5 to 6 inches wide.
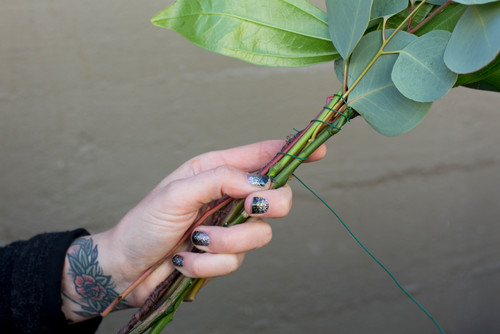
2. Secure the bundle onto the end of the grapevine wire with the paddle wire. Starting where the stems meet the foliage, wrap the wire tightly five or six times around the stems and spiral down the length of the stems, making sure to wrap the wire around the stems and the grapevine wire. Cut excess stems but do not cut the paddle wire.

3. Make a second bundle of foliage just like the first. Lay it on the grapevine wire so that the end of its foliage covers the previous bundle’s stems, then wrap the paddle wire around the second bundle’s stems five or six times to secure it to the grapevine wire.
In this photo, Smith shows the underside of the garland she is building. Notice how the bundles are close but not too close. You want to space them so that each bundle just barely covers the previous bundle’s stems, or you’ll need more materials and your garland will be too dense.
Continue making foliage bundles and layering them along the grapevine wire with the paddle wire, cutting the excess stems as you go along but leaving the wire attached to the paddle.
4. Once you reach the end of the grapevine wire (which took four bundles for this garland), wrap the last bundle a few extra times with paddle wire to secure it. Do not cut the wire.
If you plan to use the garland on its own to drape over a doorway or along a banister, you’re done. Simply wrap the wire a few extra times around the end of the last bundle, cut the wire and secure it into the foliage.
If you’re planning to use this as a centerpiece, you’ll want to cover the stem edges.

5. Make another bundle just like the first and lay it at the end of the garland in the opposite direction as the previous bundles, as seen here.
6. Wrap the paddle wire several times around the stems of this bundle, as well as the stems the bundle is covering, but still leave the wire uncut.
At this point, foliage covers the entire garland, but there’s a flat spot where the ends of the bundles meet.
7. Make one more bundle of foliage (the sixth bundle here) and lay it on the garland, reversing direction again so that it faces the original direction. Wrap the paddle wire several times around the stems to secure the bundle to the garland.

8. Cut the stems and the wire, tucking the wire into the garland.
Tuck a few extra pieces of foliage into the garland to fill it out and balance any bare patches. Your flowers and additional garland fixings will help fill any flatness or gaps you still may have.
Your evergreen garland is now complete. You can display it on a mantel or use it as a centerpiece that will last for a few weeks.
Anything after this step is extra and should be done on the surface where you intend to use the centerpiece.
The Garland Fillers
9. Cut branchlets off conifer branches to tuck into the garland, making sure you’re creating balance throughout the piece.
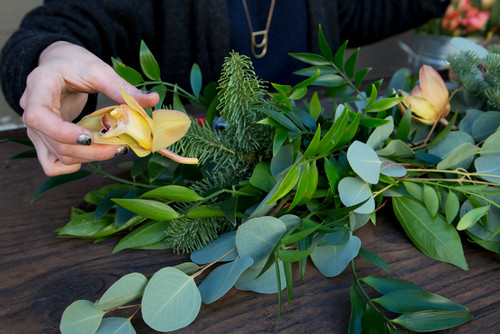
10. Now start filling the garland with flowers. For this one, Smith cut individual blooms off two stems of cymbidium orchids, inserting them in different directions in various parts of the garland.
11. Cut five holly (Ilex sp.) branches into 2- to 3-inch-long pieces. Insert them into the garland, tucking the stems into the foliage in different directions.
12. Cut echinacea pods 4 to 5 inches long and tuck them in any gaps, continuing to build out the entire garland but filling the center most.

13. Add focal flowers to the middle of the garland. Here, Smith inserts one protea stem, followed by amaryllis stems cut a few inches long, clustering them all toward the center.
14. Cut tulips 4 to 5 inches long and tuck them into the garland. The key is to achieve balance throughout while subtly building up the center and transitioning to lower ends.
15. Cut roses 4 to 5 inches long and use them to fill any gaps. These roses are Helios romantica, which are unscented.
 By
By 16. Finally, place golden persimmons to bring color contrast to the garland. Leave some on the stems and trail others off the garland onto the table.